Showing posts with label body. Show all posts

Friday, March 8, 2013

Italian Toast {Recipe}

You know those light bulb moments that happen every once in a while that make you question who you are? 'Cuz seriously, you can't be THAT smart! I lied. You totally can. I can't though.

Actually, I did once...and that was when I came up with Italian Toast. Can I say that this has been a meal for us, and not just a snack? Not only is it healthy but it has cheese, people. And if you need to know anything about me in this lifetime, is that I am addicted to cheese. Which also means my definition of healthy may contradict the actual definition of that word.


My husband would probably throw in a joke how I'm super "cheesy" right in here {if you've been around for longer than 3 seconds, you've probably caught that.}  I am but not compared to this amazing mozzarella topped wheat bread with tomato and pesto.

Here's what you will need:
- Olive oil, garlic powder & basil seasoning
- 1 small jar of basil pesto {or homemade}
- 1-2 cups chopped tomatoes
- 1-2 cups shredded mozzarella cheese
- 6 slices of whole wheat bread {or any kind really. Tastes great on ciriola!}

Preheat the oven to 350 degrees.
Take your bread slices and place them on a baking pan sprayed with cooking spray. Drizzle a little olive oil over the slices, then dash on some garlic powder {doesn't take much.}
Spread the basil pesto on the slices and top with tomatoes. Sprinkle the cheese and some basil seasoning.
Bake for about 5-10 min, until the cheese is melted and the edges of the toast are light brown.
Cut into squares or strips and serve!

Man I love being creative in the kitchen.
Do you? Have any recipe posts from this week?
Share the links in the comments, I'd love to see them!
Linking up @
Or so she says

Monday, October 29, 2012

Nom Nom Linky Party/Crockpot Caramel {Recipe}


Mmm how does this look, guys?
This is sweet & tasty caramel, right out of a can! I know, it's a can, in the crockpot...who would have guessed. I made this overnight, while I was sleeping...so by morning, I had this glorious stuff oozing out of the can, ready for me to drizzle it over cupcakes :)

How do you get this overnight caramel, you are wondering?
Well, I found it here {thanks to Pinterest, duh} and knew I HAD to try it!
Take 1 can of sweet condensed milk and place it in the crockpot, with water filled to the top of the can. Cook on low for 8-9 hours or high for 4...that's it!!
No, seriously, you're done ha!
Simple, Yummy, and yes...you can eat this right out of the can
{I did and I'm not ashamed. Not even a little.}

Do you have a creative/yummy recipe?
Something that will make us all go "nom nom"?
Let's see it! I love finding new recipes and I'd love to feature some next week {I'm kinda planning on this being weekly but we shall see. Comment and let me know if it should!}

Here are the "Yes & No's" before you link, please read & follow:

1.) No, you don't have to be a follower to link-up
{but it sure would be nice of ya. I will visit your blog if you do :)}

2.) Yes, link straight to the recipe post itself

3.) No, please don't link your full blog address/shop/facebook/twitter etc!
This is a yummy linky...not a social media-stomach ache party

4.)Yes, it would be nice to visit at least TWO other links and say hi!

5.) No, you can't have fun {I lied. You can. I just wanted a #5 hehe}

Be sure to place some text with the link to this party at the bottom of your post!
Yay, so excited to see what you guys are cookin' :)


Tuesday, October 9, 2012

Momma's Dip {Recipe}


I realized yesterday that I had not shared a recipe with you guys in so long!

I love cooking, though I don't do it everyday (who does? anyone? do you?) and this recipe is by far my fav. Why? Well...isn't it obvious? It's a chip dip!! I can sit and eat chips and dip ALL day...it's kinda sad really. Ask any family member of mine and they will be my witness...

Plus, it's super easy and most of these ingredients are on hand anyway. I am calling it "Momma's Dip" because it belongs to my mom and honestly, we don't have a "real" name for it. Every time we have a family get together, we just say "Hey mom, are you going to make your dip?" We only love her for this recipe right here...yeah I guess giving birth to us is pretty special too but this dip is it. Pretty much.


 Here's what you need:
- medium to large size platter
- 2 packages of cream cheese
- 1-2 cups shredded mozzarella cheese or any shredded cheese (or all shredded cheeses...why not!)
- 1-2 cups shredded lettuce
- 1 can of salsa (I prefer mild but it's your taste buds)
- (optional) chopped up onions and peppers

Here's how easy it is...you will thank me...

- Take the cream cheese and melt it in the microwave. It may be best to do one package at a a time, and it melts in about 30 seconds or less...you don't want to over-do this step because then you get burnt cream cheese that's all bubbly and runny, eek...

- Spread the cream cheese evenly on the platter, right to the edges. Spoon the can of salsa right over it, spreading it evenly as well. Add the chopped veggies if you are using them (I normally don't but it does taste good). Top with the lettuce and sprinkle on the cheese. Pop it in the fridge for at least 30 minutes before serving and wala! Serious yummyness (that is a word, I am claiming it.)

Soooo good and perfect for a quick snack, or if you have guests coming over and want something for them to munch on. Throw some tortilla chips in a bowl and get your dig on! (not sure if I want to claim that phrase though...I'll think about it.) Sometimes I even make a small, personal one for my husband and I to eat during a movie. It's perfect and we finish off the entire thing!

Oh, I am working on a Recipe tab for the top of the blog, kind of how I had it last time before my big blog revamp. That way you can just click on the tab and it will bring up all the recipes I have shared thus far...wouldn't that be cool? Happy dipping!


Monday, July 30, 2012

Easy No-Waste Potato Skins {Recipe}


I'm calling this recipe "no-waste" because regular potato skins recipes call for you to scoop out all the yummy stuff in the middle of the potato. Some recipes say to mix with the cheese while others want you not to use it at all. I had originally found this recipe on another website, however, I cannot find the link anywhere! I believe it must have been deleted...so my apologies, I wanted to give credit but oh well, onto the good stuff...


What you will need:
Olive oil
6-8 large russet potatoes (or whatever kind you like)
Bacon bits or real bacon, crumbled
Shredded cheddar cheese and/or melted Velveeta cheese
Chives (optional. I didn't use them because 1. Didn't have them & 2. I'm nursing. Onions are NOT good for my boy lol)
Sour Cream

Preheat oven to 350 degrees. Dice the potatoes in nice circles, just cut straight across...

Boil for about 5 minutes, or until a fork can pierce through...

Drain and overlap on a greased or sprayed pan, drizzle some olive oil, sprinkle cheese and bacon evenly and bake for about 15 minutes or until cheese is melted ...

WALA! Easy meal or appetizer, top with sour cream and indulge!
My fav recipe for those lazy days or moments I crave something that tastes like it was from a restaurant (you know what I mean)


 Aw man, now I WANT some!!! *sigh*
Enjoy kids :)

Sunday, July 15, 2012

Easy Crockpot Chicken/Broth {Recipe Tip}


Okay, if you're like me, making meals can be...well, like a chore lol

I'm working towards being more organized and to think about our weekly meals ahead of time. Enter in this simple chicken crockpot recipe tip! We use chicken A LOT and I cannot believe I didn't think of this sooner. Basically, using this method, I will always have yummy cooked chicken on hand for quick (and maybe some planned) meals. Do this on a Saturday or Sunday, and have chicken for the week!!


Here's what you'll need:
- 4-6 uncooked chicken breasts
- Cooking spray
- Salt/pepper/whatever spices you'd like
- Foil
- Crockpot

 Cut the chicken into cubes or strips. Cut a piece of foil, spray with cooking spray.
Season chicken to your liking.

 Fold over the foil, like above...

 ...then fold the end towards the center...

...creating a nice lil' foil pocket, like so :)

Turn the crockpot on low, spray the inside and place the chicken foil packet inside.
Pour about 1/3 cup of water in the bottom and cook for about 4-6 hours.

Wala! Cooked chicken for your weekdays, and you didn't have to slave over it...oh, and...

...you get chicken broth too!! Perfect for making soups, especially in the crockpot :)

That's it for now, hope you enjoyed this easy crockpot tip!
What kind of crockpot tips do you have/use?

Saturday, June 23, 2012

Chili Cheese Nachos {Recipe}

 Man, I haven't posted a new recipe in like forever! I don't know about you, but I love me some nachos...especially encased with cheese...I threw this together and created this recipe for three reasons:

1.) I was too lazy to cook REAL dinner
2.) I wanted something easy yet yummy
3.) I hadn't done groceries, so I used whatever I had
Feel me? You've been there...

Here's what you need:
-      1 bag Tortilla Chips
-      1 can salsa
-      1 can chili beans
-      5 slices or more of Velveeta (to your liking)
-      1/4 cup milk
-      ½-1 cup chopped lettuce

Heat oven to 350 degrees. Spray a 9x13 pan with cooking spray, spread chips at the bottom. Top with drained beans, salsa and lettuce.
Melt cheese in a heat safe bowl in the microwave for 1 minute. Mix in the milk with a spoon, return to the microwave for 30 seconds. Mix until smooth, spread on top of lettuce.
     Bake for about 10 minutes and serve immediately. Top with sour cream & enjoy!

    Recipe suggestions: 
    Adjust ingredients to your liking.
-   For a little extra something, brown some ground beef with taco seasoning and
    add on top of the beans before the rest of the ingredients. 

Tuesday, February 28, 2012

Red Velvet Cheesecake Brownies {Recipe}


Pin It One word...WOW!!

Strapped for cash and too pregnant to want to go to the stores for Valentines Day (crowds *cringe*
I decided the best gift for my hardworking husband was a nice desert.

He is not picky and loves sweets (especially if I experiment, then he's my taste tester hehe)
I wasn't sure exactly what I wanted to make, until I saw this post from Sweet Pea's Kitchen through Pinterest.
Funny thing, sweet pea is actually my aunt's nickname for me! but that's not why I chose this desert...
it just looked amazing and I NEEDED to make them!!

Pin It
It was actually super easy and fun to do.
Here is the recipe with my own highlighted notes in case you care :)
Ingredients:
  • 1/2 cup butter
  • 2-oz dark chocolate, coarsely chopped *I used milk chocolate chips, 2-oz*
  • 1 cup sugar
  • 2 large eggs
  • 1 tsp vanilla extract
  • 1 1/2 tsp red food coloring
  • 2/3 cup all purpose flour
  • 1/4 tsp salt
  • 8-oz cream cheese, room temperature
  • 1/3 cup sugar
  • 1 large egg
  • 1/2 tsp vanilla extract
Directions:
  1. Preheat oven to 350F. Butter the bottom and sides of a 8 inch metal baking pan (I used an 8" glass dish, worked well). Put a long piece of parchment paper in the bottom of the pan, letting the parchment extend up two sides of the pan and overhang slightly on both ends. (This will make it easy to remove the bars from the pan after they have baked.) Butter the parchment. (Foil will also work just fine, but spray it with a cooking or baking spray.)
  2. In a small, heatproof bowl, melt butter and chocolate together. Stir until combined and very smooth. Set aside to cool for a few minutes. (I threw it in the micromave to melt and it was good. I wasn't patient enough!)
  3. In a large bowl, whisk together sugar, eggs, vanilla extract and red food coloring. Add chocolate mixture and stir until smooth. Add flour and salt and stir until just combined and no streaks of dry ingredients remain. (You can add another 1/2 tsp of coloring if you want it more vibrant.)
  4. Pour into prepared pan and spread into an even layer.
  5.  To prepare cheesecake mixture, beat cream cheese, sugar, egg and vanilla extract in a medium bowl until smooth. Distribute the cheesecake mixture in 8 dollops over batter in the pan. Swirl in with a knife or spatula. (Knife worked way better for me!)
  6. Bake for 35-40 minutes, until brownies and cheesecake are set. A knife (or toothpick) inserted into the cheesecake mixture should come out clean and the edges will be lightly browned.
  7. Let cool completely in pan on a cooling rack before lifting out the parchment paper to remove the brownies.
  8.  Cut into squares and serve!!
My little ghetto desert setup hehe 
The husband loved it :)

Monday, February 13, 2012

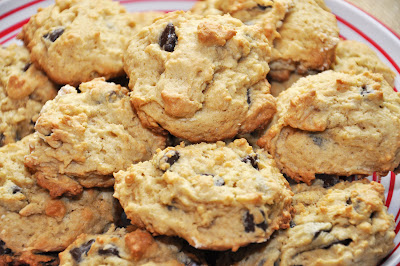
Amazing Chocolate Chip Cookie {Recipe}


 There are times in life where one steps back and says...
"Man, this is one great cookie!!"

Last week, I had such a moment with this recipe I found on Cooks.com
I was left with a condo that smelled like heaven, a husband who couldn't wait for the next batch and a very satisfied preggo woman :)

Here's what I did:
1 1/2 sticks butter (12 tablespoons)
1 cup light brown sugar, firmly packed
1/2 cup white granulated sugar
2 eggs, lightly beaten
2 1/4 cups sifted flour
1/2 tsp. salt
1 tsp. baking soda
1 1/2 tsp. pure vanilla extract
1 cup semi-sweet morsels
(the original recipe had nuts and raisins but I opted out.) 

Preheat oven to 375°F.

In a mixing bowl, cream together butter and sugars. Add eggs.

Sift flour and measure out 2 1/4 cups. After measuring the sifted flour, sift again with remaining dry ingredients. Add the flour mixture to the creamed butter and sugar mixture. Stir in vanilla and semi-sweet morsels.

Drop the cookie batter by tablespoonfuls onto a parchment or silicone lined baking sheet. (I actually had neither, so I settled for some good ol' aluminum foil...sprayed with cooking spray & worked great!)

Bake for 10-12 minutes or until cookies are set and firm and only lightly colored.
Do not allow cookies to brown.
(Seriously, I have a habit of doing that! With this recipe though, 10-11 min is plenty and you'd be surprised how moist and perfect the cookies are if you don't let them brown on the top.)

Transfer to wire racks to cool. (I just left them on the foiled pan, whatever) This takes like two minutes.
Serve with the tallest glass of cold millk you can find and eat your little heart out!!!

As usual, since I'm only baking for two, I had lots of dough left over. This makes a bunch, so I scooped half of the leftover dough in a container for cookies the next day (per my handsome man's request) and the other half, I rolled in a nice cylinder shape, wrapped with freezer wrap, marked the date and froze it.
This dough can most likely last frozen for up to 3-4 months! But...I doubt it'll last that long in my house...


Monday, January 16, 2012

How to Make S'Mores Bars {Recipe}


Happy Monday!
Now, who wants to break their New Year's diet resolution already??

Frankly, I'm pregnant so I can pretty much do what I want...ha! I'm more of a salty/chips snacker but lately my hormones have me craving chocolate like mad. Of course, my handsome prince of a husband LOVES this because then he has an excuse to indulge.

So, I busted out this recipe I've had for a while for S'Mores Bars. S'Mores are my absolute favorite and I knew instantly that this recipe would be my golden ticket to calorie bliss...I mean, chocolate bliss...yea...


Okay, here's what you will need, my friends:
- 2 sticks unsalted butter, melted (plus a little more for the pan)
- 18 graham crackers (about 2 packages)
- 1/4 cup sugar
- 1/2 teaspoon fine sea salt
- 3 cups milk chocolate chips
- 3 1/2 cups mini-marshmallows

Preheat the oven to 350 degrees F. Line the bottom and sides of a 13x9" baking pan with foil. You want to leave about 4in. of overhang over the 2 opposite sides. These will serve as "handles" to remove the bars from the pan in one piece. Grease the foil well with some of the softened butter.

In your food processor, grind the graham crackers into a fine meal (you need 2 cups.) In a large bowl, combine your crumbs with the sugar, sea salt and melted butter. The mixture should look like and feel like wet sand. Set aside 1/2 cup of the crumb mixture for the topping.
Evenly press the rest of the mixture into the bottom of the pan. 
**Note: This took me a little while because you don't want any spaces, or else your crust will be crumbly. I used the back of a small spoon to even and smooth the layer.**
Pop your crust into the oven and bake until it is golden brown, about 12-15 min. Remove the pan from the oven and allow it to cool on a rack or on a dishtowel on the counter.

Melt the milk chocolate in a saucepan over low heat, stirring continuously until fully melted. Do not turn up the heat to hurry the process!! Keep it on low. You can also microwave your chocolate on low power, stirring after 2 min.

Preheat the broiler, low setting.
**Note: I never used my broiler before this and didn't know there were two settings. Yikes! I almost burnt the crud out of my bars! Besides the nice smokey smell in the air and the lovely music from the fire alarm (which made puppy girl's ears go CRAZY btw), the bars did not burn. Phew!**

Pour the melted chocolate over the cooked crust. Spread it evenly with a butter knife or back of a spoon. Sprinkle the marshmallows over the chocolate and press them lightly into it. Sprinkle or lightly press the reserved crumb mixture over and in between the marshmallows, so that no chocolate shows through.
Broil the bars 6 in. from the flame until the marshmallows are golden brown (not coal black like mine hehe) Should take 1-2min.

Refrigerate the bars until the chocolate is hard, about 2 hrs or so. Grab the ends of the foil and lift the bars out of the pan in one piece. Place on cutting board and cut into 24 squares. Wala!! Eat up & enjoy!!

-------------------------------
Just a reminder, there is a giveaway going on that will end tonight at midnight!! ENTER IF YOU WANT TO WIN THIS FREE 5X7 ART PRINT:


There's only one entry so far...that's not much of a competition ya'll!
It's FREE so what have you got to lose?
Related Posts Plugin for WordPress, Blogger...
Blogging tips