Showing posts with label toddler activity. Show all posts

Thursday, August 14, 2014

Breakout Shop: Happy Sack


Happy Thurday ya'll! Can I just say this week has been nuts? Being home with the boy sick all week...I'm so ready for a vacation. The worst part was trying to occupy our time without the tube on. I honestly wished I had a dozen of Shelby's amazing Happy Sacks! She is a fellow Storenvy shop owner and creates high quality handmade hacky sacks. They make great sensory toys for toddlers and also can be used the standard way. I know David would love them. Her shop is just breaking out and being a fellow work-at-home mama, I thought it would be fun to interview Shelby about her passion and share it with you all!


Tell us a little bit about your shop name and how it came about.
Originally I was only going to sell standard hacky sacks in my store. I wanted a name that was cute but my fans and customers could easily tell what I was selling. One of the first hacky sacks I made was from an orange creamsicle colored yarn. when I gave it to my daughter to play with she got really happy and started clapping. It was a hacky sack that made her happy, so I decided to go with the name Happy Sack.

Every creative person has something or someone that drives their passion. What or who is your primary inspiration?
I started by making a couple of balls for my daughter. My husband thought they would make great hacky sacks. So I changed the filling a few times and my husband tested them until I had a great hacky sack. My daughter tested my creations until I had a great Toddler Ball. I wouldn't have a store if it wasn't for my husband and daughter.

What is your favorite thing about being a shop owner?
I think my favorite thing is the flexibility. I stay home with my daughter most days so a 9 to 5 working day is not practical. I love that as an online shop owner I can work early in the morning and late a night when my daughter is asleep. I can also use my phone to connect with fans on social media at odd times in the day and still be with my daughter.

If you had three business wishes, what would they be? (I would probably wish for more! ha!)
My biggest wish would be more time in a day! There never seems to be enough. The second would be more colors to the yarn I use. I have a cotton yarn addiction that is fulfilled/fueled by my shop. The third would be a web design fairy. I am great at crocheting balls and improving my photography but my online image could use some work.

You are a working mama, as am I. Share with us a funny story or piece of advice for how to keep everything together! lol
As a mom working at home I've noticed I sometimes need separation. Most days I multitask. I'll crochet or tweet while my daughter is nursing. But I realized about a week ago that I need to have days where I'm not multitasking. So I'm starting to have one day a week where I don't do anything about Happy Sack. No emails or anything. I just spend time with my family. Another day a week I'll take my daughter over to one of her grandparents for a few hours and focus on Happy Sack. I do a lot and a couple hours a week to myself really help me keep my sanity.

Spotlight is on you, girl. Anything else you'd like to say?
I love my family and I enjoy making every item that is in my shop. I love seeing how much my daughter enjoys the balls that I make. I would love to spread that joy that I see on her face to other children.


Thanks for sharing your wonderful story, Shelby! I'll definitely be ordering from you soon for the next sick day :) 
To connect with her and purchase a handmade hacky sack for your little one, follow the links below.

Shelby is also super awesome for offering all Hello Awesome readers a 15% off promo code!  
Use code AWESOME at checkout, good until September 9th.


This post is sponsored by the sweet Simply Love
http://www.vintagesimplylove.blogspot.com/ 

Tuesday, June 17, 2014

Toddler Activity: Watercolor Bubble Paper


Here we are in mid June. School is either out or just about over and soon your house will have little people filled with big energy. Whether you're a mommy to one cute toddler (here!) or a couple of crazy kiddos, one thing is for sure...they need something to do. I'm all about creating fun, interactive activities that encourage creativity and incorporates a child's personality into the craft.


Bubbles are such a summer time staple. Combined with watercolor paints and large sheets of paper, toddlers and kids of all ages will have a blast blowing colorful bubbles and making art!

Here's what you'll need:
  • A quarter or half of an egg carton (depends on how many different colors you want)
  • watercolor paint tubes, non-toxic and washable
  • bubble solution and wand
  • large sheets of white paper (the thicker, the better)


Normally when you create watercolor paint, you mix the paint with water. For this activity, use the bubble solution as a substitute. Fill each egg carton section with about 1 tablespoon of bubble solution. Then add a drop or two of watercolor paint in each, creating as many colors as you'd like. Use a small spoon or a straw to stir the paint into the solution.


For this next step, use your discretion. I have a toddler so I knew that if I laid an old tablecloth on the floor covered in paper, it would be a fun and messy activity that would keep his attention. For older kids, you can just cover a tabletop with the paper. Totally up to you. Or take this activity outside! I will have to try that next time.


Give them the bubble wand, paints and step back, mama! Or just stand by and get sprayed in the face like I did. Show the child how to blow the special bubble paint onto the paper or at least in that direction. You can practice different techniques like blowing the bubbles closer or farther away to get different size drips. David had a much better time going the Jackson Pollock route and flinging the paint across the paper. Well, he flung the paint and it just so happened the paper caught it! Either way, he had fun and improvised when the paint spilled by using his fingers and toes.


See all the cool effects on the paper? It was really neat when the bubbles stay on the paper and David popped them. Now I have to figure out an awesome craft where I can use all this beautiful paper!

Do you have a summer craft bucket list with your kiddo/kiddo?
Share an activity you're planning on doing this season in the comments, I'd love to know.

Friday, February 7, 2014

Kid Craft: Valentine Bird Feeder Mobile


Yay, happy Friday beauties!!
I still love Fridays even though I stay at home with my boy. There is just something about the day before the weekend that is exciting, no matter if you go to school, stay home, work at home or go to work. The sun is shining too which always puts a little pep in my step!

Today I'm sharing with you a lovely craft David and I did last week. It's super cute, fun and kind of messy. Which actually surprised me but that's probably because I don't have much experience making bird feeders. This activity taught me a lot about how to handle projects with sticky materials and little grabby hands.


The photo above highlights what you will need but I did use string instead of the red ribbon in the end. It's fairly easy though and there are lots of aspects that encourage children to use their senses. Colorful scrap fabric draws the attention of the eyes. Amazing textures like hard bark on the twig, rough paper and silky ribbon or rope. The smell of mixed trail mix and sap on the pine cones. Don't forget the peanut butter! Of course, they have to taste it first before crafting. It's like the unspoken rule of having peanut butter around.

Here's what you'll need:
- Scraps of fabric
- Twig
- 2-4 pine cones
- Bag of trail mix
- Peanut butter
- Ribbon or string
- Red paper
- Scissors
- Tape


First, I let David take a large spoon and break up the trail mix a little. He had fun pounding the bag and was very intrigued with looking at the contents, squishing the bag in his hands. While your kiddo is busy doing that, tie the string to the top of the pine cones and scoop out some peanut butter on a paper plate. I don't have pictures of the process because I try to enjoy the moment. Plus the added pressure to take pictures, for me, takes away some of the interactive fun between my son and I.

Next, let them roll the pine cones in the peanut butter and either dip them into the bag or dump the trail mix on a paper plate and roll the pine cones in it. The smaller the trail mix pieces, the better! While they are doing that, cut out a few small heart shaped pieces from the red paper.


Then, have them wrap the scrap fabric around the twig or help them do it. This part David loved (besides eating the peanut butter) because he liked holding the twig and watching me spin the fabric around it. He also would spin the twig while I held the fabric still. Tie the ends of the fabric to the twig. We did a few different kinds of fabric, inter-lapping and weaving them. Be creative!


Lastly, tie pieces of string to the twig and tape the hearts to it. I used tape because I didn't want to fuss with glue on top of the peanut butter; that would've been a yucky surprise should David think it was a snack! He did like helping me tape the hearts to the string. Next time though, we will use glue or a double stick tape. Attach two long piece of string on either sides of the twig to be used for hanging.

Finish the mobile off by attaching the pine cones and wala! Time to hang and watch the birds flock! Or in our case, witness the calculated destruction our neighborhood squirrels provoked as they demolished our beautiful masterpiece and stole those luscious pine cones.

In the end, it really wasn't about feeding the birds anyway. This craft is a fun, interactive learning tool for any child at any age. Plus adding hearts helps it become all Valentine-y and stuff. Personalize it to your kiddo and go at it! Just make sure you have extra peanut butter and nuts for your little sweetheart.

Have you been doing any Valentine themed kiddo crafts lately? Honestly, I hardly ever do themed crafts geared towards the Holidays but I felt led this time. Check out these mini hearts and arrows pancakes David helped me create as a perfect Valentine breakfast for kids that morning!

Tuesday, February 4, 2014

Mini Hearts & Arrows Pancakes


It's the month where we celebrate love and showering the people we care about with candy hearts, sappy cards and breakfast in bed. I thought of this cute idea for moms with little ones who might want to make that Valentine's Day morning something special and sweet.

So I give you mini Hearts & Arrows Pancakes! How adorable, right? These little darlings will put a smile on any child's face. Plus, they are small enough to hold one in each hand, which David loves to do!

Here's what you'll need:
  •  Pancake mix
  •  Strawberries, chopped, fresh or frozen (thawed)
  •  Sprinkles
  •  Heart-shaped cookie cutter
  •  Toothpicks
  •  Cardstock (any color you'd like)
  •  Sharpie
  •  Scissors
Mix the pancake batter the way you normally do. In a small bowl, warm up the chopped strawberries in the microwave for about 30 seconds and then blend them in a blender. Add the strawberry mix to the pancake batter and stir. Pour the batter in a large heated and greased pan, adding a handful of sprinkles on top of the batter. Cook/flip the pancakes until done. Set aside on a plate to cool.

As the pancake is cooling, take the sharpie and draw a feather template for the arrow. It's okay if it's not perfect, any imperfections will just add to the whimsical factor of this project. Cut out the feather template and use it as a stencil to create more (if you wish.) I made just two; one in a metallic magenta and the other in a lovely vintage light-blue. Using the scissors, cut two small holes in the center. (See the photo above for placement suggestion.)

Then slip in your toothpick and you've got some cute mini arrows! Now that the pancake is cool, use the heart-shaped cookie cutter. My pancake was kind of spongy so I really had to press down with the cutter and peel away the outside pancake. Pierce the hearts with the arrows and arrange them however you feel your little ones would love!

This adorable illustrated vintage jug is available in the shop right here!

This would be a great activity for toddlers or older children. If you have a tot, you could have them help with mixing the batter like David helped me. Just be prepared to lose a few strawberries to hungry hands :) They also could help cut out the heart shapes. Older kiddos would probably love mixing too, adding the sprinkles, cutting out the hearts and assembling the arrows (just watch out for the pointy toothpicks.) Make it fun and interactive! The memories will be sure to last longer than this yummy treat. Sharing here:
Glossy Blonde

Friday, January 24, 2014

Easy Indoor Activity: Toddler Bowling!


It's cold. I'm not sure if you noticed but here in New England the winter time can be fierce and a little depressing. Sure snow is beautiful but when you have an energetic little one on your hands and temperature outside is creating an ice wonderland, the last thing mamas want to do is put 15 layers on (both her and child) and send them slipping down the driveway! To be honest, we always have a blast in the snow but the truth is some days are too cold and unsafe for a child.

My husband and his father go bowling every week in a league. It has been a tradition since he was about eight years old. I think it's super sweet and awesome that they can bond that way. It will be so cool when David gets older and he can join them. That got me thinking about how fun it would be to create a small bowling alley right here at home!

To be honest, there wasn't much planning with this one. I literally saw that my son was bored and the idea popped into my head, so I ran around gathering what I needed, which took all about 5 minutes. And the fun lasted for hours. Not to mention it's something quick you can put together every day and put to the side without mess or fuss. He had a blast :)


What you'll need:
  • two pool noodles
  • 4-8 plastic bottles, labels off
  • uncooked rice or beads
  • a ball
Since pool noodles are so light and have a hard time staying put, I wedged one end under the sofa and spaced the noodles about two feet apart. Now that I look back, I could've taped them to the floor but I'll have to try that next time and see it if is better. This worked just fine.

Fill each bottle with half an inch to an inch of rice or beads. Just enough to keep the bottles upright. If you fill them too high then the bottles become heavier and may be too hard for toddlers to knock down with the ball. You could start filling them low and work your way up to increase difficulty if your kiddo starts to go pro! The bottles are also good as a separate sensory activity since they make a cool sound when they shake and fall. David rolled the ball only a few times before he realized he wanted to shake all the "pins" instead.
*Just to note: I didn't glue the caps of the bottles but you sure can if you're worried the rice or beads can be a choking hazard. I probably will next time even though he couldn't open them.

Set the pins up at one end and let your toddler roll the ball to knock them down! Explain to them what to do, show them how a few times, give them some room and watch all the fun. This was not only toddler approved but my tween siblings loved it as well! I mean, who doesn't love bowling? The living room was filled with giggles and what sounded like maracas.
Needless to say we had our own bowling alley for about a week before he lost interest. Such a cheap yet fulfilling activity when stuck indoors this season.

What is a favorite indoor activity for your family?

Thursday, September 12, 2013

DIY Fall Kid Craft: Handprint Wreath


I don't know why but this season really hit me that my baby is no longer a baby. Maybe it's all the running around that goes on in my house. And yeah, I'm talking about me. Running here to get him out of a drawer or running there to direct him away from climbing the stairs. Phew, if you want a good workout, have a toddler!

An amazing new thing is how much fun we have doing crafts. I'm starting to document them more on the blog since I don't want to forget all the fun things we do and I really want to share them with other mommies. At 16 months, he can interact more while doing handy crafts which is so entertaining, rather than trying to do a craft with a newborn: which means they breastfeed while you stamp their foot to a piece of paper.


You only need a few things for this craft and you probably already have them in your home!
Here are the basics:

- 2 sheets of cardstock, different colors or patterns
- 2 sheets of construction paper, different colors
- Glue stick or tape
- Crayons
- Scissors
- 8x8 inch piece of cardboard
- Piece of twine
- a child, preferably your own

That last one is just to be sure. Unless you're a sister, aunt or grandmother. Other than that, things can get creepy.


Take the construction paper and let the littler guy or gal to doodle their heart out with the crayons. Show them how to write their name or let them do it if they are older. Make this part a small craft on it's own, because technically, this is the only part they do! After they get their Picasso on, simply turn the sheet around and trace their handprint on the back. Cut out the handprint and use it as a stencil for the rest of the hands. Cut out about 12, or 2-3 handprints per sheet of cardstock and construction paper. 


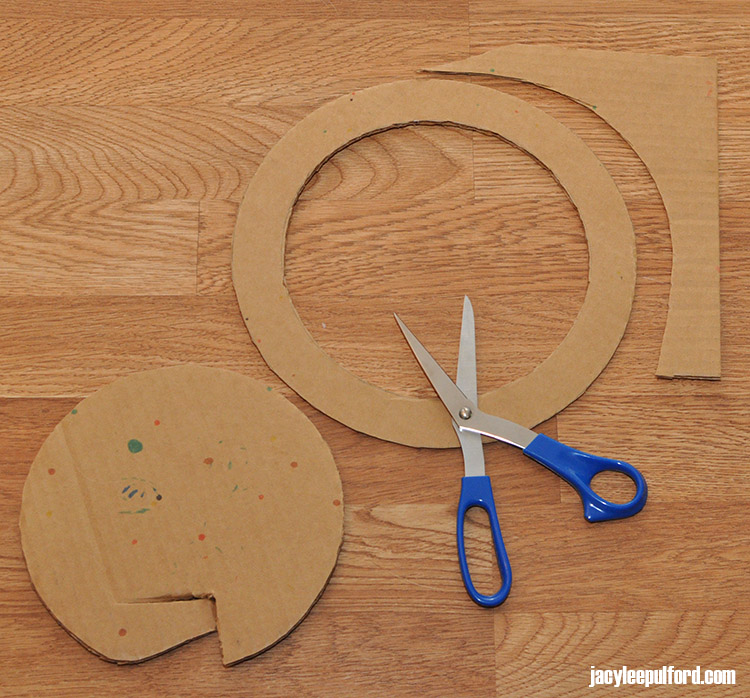
Use a small and medium plate to trace circles onto the cardboard, one for the outer line and one for the inner line. It should make a good size ring shape. Cut out the ring shape.

Glue or tape your little one's handprints on one side. You'd want to "fan" them out like leaves or feathers, making sure they hide the cardboard. Turn the wreath around so that the cardboard is face up. Measure a length of twine about 3 inches long and string it across the top, only taping at the ends. This will be how you hang the wreath...like...


...tada! I was so excited to add this to my dining room plate wall! Yellow and orange are part of my decor colors so the wreath blended right in. Of course, it's just so touching to see his sweet hands decorating the wall. It's going to make a great addition to my fall decor and an even better keepsake for him later on.

Have you added any kid crafts to your decor?

Thursday, March 28, 2013

DIY Baby Sensory: Edible Painting with Real Fruit!


Naturally I am an artist so I'd love to pass on some creativity to my youngin'. I mean, come on, his good looks are from his daddy {insert brownie points here.} I combed Pinterest looking at different edible painting ideas on various blogs and sites but none of them fit what I wanted to do with my boy.

David was breastfed and when he was introduced to solids, I took time to make the food myself. It saved us lots of money and I felt good about feeding my baby real, wholesome meals instead of factory infested foods, like his mommy and daddy eat. I understand not every mom can do this, I'm not boasting here. You gotta do what you gotta do. I was blessed to be able to give my baby the best nutrition especially within his first year of life.

Enter in this homemade paint recipe I whipped up! I thought "You know, fruit is colorful, why not paint with it?" This is how my brain works, friends. I see something not as it is but what it can become. Rather than using corn syrup, sugars and artificial dyes, I opted instead to use natural fruit with some ingredients we already have on hand at home.

What you will need:
- Fresh or frozen fruit {I used frozen and just microwaved until soft. I lack patience, what can I say}
- Medium bowl
- Flour
- Water
- Paper
- A cute baby {check!}

I went with raspberries and blueberries. In the photo above, I show the ingredients in measuring cups. This really is for just the photo. It doesn't take that much flour or water to create the paint paste we need. I suggest play around and try mixing to get the consistency you like.
Tip: try mixing 1 ounce of fruit, 2 tsp flour and 2 tsp water to start. Then go from there.


The first photo shows the fruit before the added ingredients. If the fruit is soft enough, mash it with the spoon. If not, put it in the blender for a few seconds then mix in the flour and water. The second photos shows how the fruit thickens and becomes more paint-like.


That's it! Now for the fun part. If you are a tidy mommy, just stop now. The baby will get messy. The floor will get dirty. The highchair will get out of control. A bath will be in order. But the way I see it, I not only have a boy who will get messy eventually but I feel that getting his hands dirty and really into things is part of the learning experience. This is good for baby's tongue to explore texture and tastes but also for his hands to touch and understand different textures. Paint with real fruit, what else is better! I didn't have to worry about what he was consuming when he ate some {because of course it will go into the mouth.} And as you can see, he loves painting with fruit too.


Related Posts Plugin for WordPress, Blogger...
Blogging tips