Showing posts with label children. Show all posts

Tuesday, June 17, 2014

Toddler Activity: Watercolor Bubble Paper


Here we are in mid June. School is either out or just about over and soon your house will have little people filled with big energy. Whether you're a mommy to one cute toddler (here!) or a couple of crazy kiddos, one thing is for sure...they need something to do. I'm all about creating fun, interactive activities that encourage creativity and incorporates a child's personality into the craft.


Bubbles are such a summer time staple. Combined with watercolor paints and large sheets of paper, toddlers and kids of all ages will have a blast blowing colorful bubbles and making art!

Here's what you'll need:
  • A quarter or half of an egg carton (depends on how many different colors you want)
  • watercolor paint tubes, non-toxic and washable
  • bubble solution and wand
  • large sheets of white paper (the thicker, the better)


Normally when you create watercolor paint, you mix the paint with water. For this activity, use the bubble solution as a substitute. Fill each egg carton section with about 1 tablespoon of bubble solution. Then add a drop or two of watercolor paint in each, creating as many colors as you'd like. Use a small spoon or a straw to stir the paint into the solution.


For this next step, use your discretion. I have a toddler so I knew that if I laid an old tablecloth on the floor covered in paper, it would be a fun and messy activity that would keep his attention. For older kids, you can just cover a tabletop with the paper. Totally up to you. Or take this activity outside! I will have to try that next time.


Give them the bubble wand, paints and step back, mama! Or just stand by and get sprayed in the face like I did. Show the child how to blow the special bubble paint onto the paper or at least in that direction. You can practice different techniques like blowing the bubbles closer or farther away to get different size drips. David had a much better time going the Jackson Pollock route and flinging the paint across the paper. Well, he flung the paint and it just so happened the paper caught it! Either way, he had fun and improvised when the paint spilled by using his fingers and toes.


See all the cool effects on the paper? It was really neat when the bubbles stay on the paper and David popped them. Now I have to figure out an awesome craft where I can use all this beautiful paper!

Do you have a summer craft bucket list with your kiddo/kiddo?
Share an activity you're planning on doing this season in the comments, I'd love to know.

Friday, January 24, 2014

Easy Indoor Activity: Toddler Bowling!


It's cold. I'm not sure if you noticed but here in New England the winter time can be fierce and a little depressing. Sure snow is beautiful but when you have an energetic little one on your hands and temperature outside is creating an ice wonderland, the last thing mamas want to do is put 15 layers on (both her and child) and send them slipping down the driveway! To be honest, we always have a blast in the snow but the truth is some days are too cold and unsafe for a child.

My husband and his father go bowling every week in a league. It has been a tradition since he was about eight years old. I think it's super sweet and awesome that they can bond that way. It will be so cool when David gets older and he can join them. That got me thinking about how fun it would be to create a small bowling alley right here at home!

To be honest, there wasn't much planning with this one. I literally saw that my son was bored and the idea popped into my head, so I ran around gathering what I needed, which took all about 5 minutes. And the fun lasted for hours. Not to mention it's something quick you can put together every day and put to the side without mess or fuss. He had a blast :)


What you'll need:
  • two pool noodles
  • 4-8 plastic bottles, labels off
  • uncooked rice or beads
  • a ball
Since pool noodles are so light and have a hard time staying put, I wedged one end under the sofa and spaced the noodles about two feet apart. Now that I look back, I could've taped them to the floor but I'll have to try that next time and see it if is better. This worked just fine.

Fill each bottle with half an inch to an inch of rice or beads. Just enough to keep the bottles upright. If you fill them too high then the bottles become heavier and may be too hard for toddlers to knock down with the ball. You could start filling them low and work your way up to increase difficulty if your kiddo starts to go pro! The bottles are also good as a separate sensory activity since they make a cool sound when they shake and fall. David rolled the ball only a few times before he realized he wanted to shake all the "pins" instead.
*Just to note: I didn't glue the caps of the bottles but you sure can if you're worried the rice or beads can be a choking hazard. I probably will next time even though he couldn't open them.

Set the pins up at one end and let your toddler roll the ball to knock them down! Explain to them what to do, show them how a few times, give them some room and watch all the fun. This was not only toddler approved but my tween siblings loved it as well! I mean, who doesn't love bowling? The living room was filled with giggles and what sounded like maracas.
Needless to say we had our own bowling alley for about a week before he lost interest. Such a cheap yet fulfilling activity when stuck indoors this season.

What is a favorite indoor activity for your family?

Thursday, September 12, 2013

DIY Fall Kid Craft: Handprint Wreath


I don't know why but this season really hit me that my baby is no longer a baby. Maybe it's all the running around that goes on in my house. And yeah, I'm talking about me. Running here to get him out of a drawer or running there to direct him away from climbing the stairs. Phew, if you want a good workout, have a toddler!

An amazing new thing is how much fun we have doing crafts. I'm starting to document them more on the blog since I don't want to forget all the fun things we do and I really want to share them with other mommies. At 16 months, he can interact more while doing handy crafts which is so entertaining, rather than trying to do a craft with a newborn: which means they breastfeed while you stamp their foot to a piece of paper.


You only need a few things for this craft and you probably already have them in your home!
Here are the basics:

- 2 sheets of cardstock, different colors or patterns
- 2 sheets of construction paper, different colors
- Glue stick or tape
- Crayons
- Scissors
- 8x8 inch piece of cardboard
- Piece of twine
- a child, preferably your own

That last one is just to be sure. Unless you're a sister, aunt or grandmother. Other than that, things can get creepy.


Take the construction paper and let the littler guy or gal to doodle their heart out with the crayons. Show them how to write their name or let them do it if they are older. Make this part a small craft on it's own, because technically, this is the only part they do! After they get their Picasso on, simply turn the sheet around and trace their handprint on the back. Cut out the handprint and use it as a stencil for the rest of the hands. Cut out about 12, or 2-3 handprints per sheet of cardstock and construction paper. 


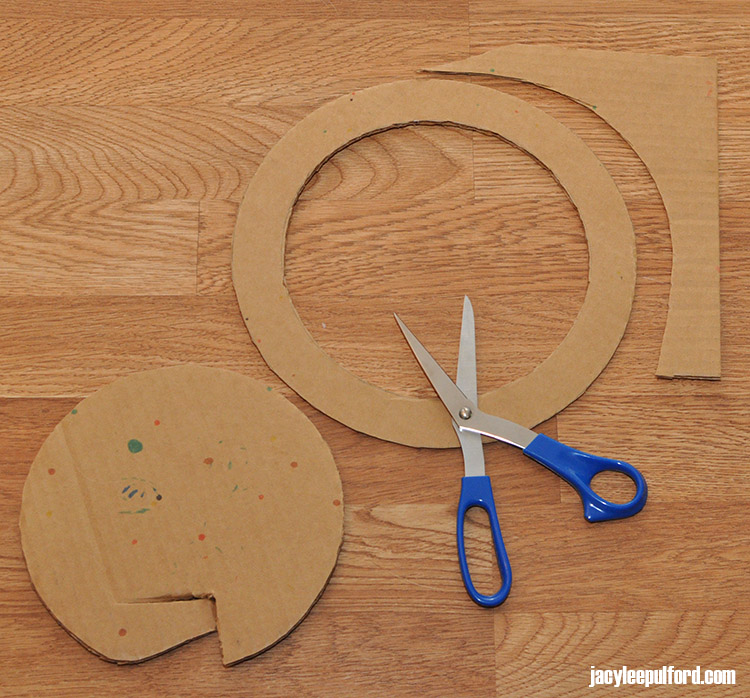
Use a small and medium plate to trace circles onto the cardboard, one for the outer line and one for the inner line. It should make a good size ring shape. Cut out the ring shape.

Glue or tape your little one's handprints on one side. You'd want to "fan" them out like leaves or feathers, making sure they hide the cardboard. Turn the wreath around so that the cardboard is face up. Measure a length of twine about 3 inches long and string it across the top, only taping at the ends. This will be how you hang the wreath...like...


...tada! I was so excited to add this to my dining room plate wall! Yellow and orange are part of my decor colors so the wreath blended right in. Of course, it's just so touching to see his sweet hands decorating the wall. It's going to make a great addition to my fall decor and an even better keepsake for him later on.

Have you added any kid crafts to your decor?

Friday, April 5, 2013

Devotion: The Edge of Miraculous

mi·rac·u·lous  

/məˈrakyələs/
Adjective
  1. Occurring through divine or supernatural intervention. 
It was 3am on a Monday morning when I got the call. The one I've been waiting for, for what seemed like forever. Only it was only 9 months. I rushed around the house like a caffeinated zombie, gathering and packing. By 5am, my mother, my little sister, my baby and I were headed up North. We were going to have a new family member!

It was about 8:15 when we pulled up to Littleton Hospital in New Hampshire. When we had called the hospital before arriving to check in on the status of this exciting situation, we had been told that my middle sister and her fiance were busy. To us, that was code for she is pushing! Ah! By the time my mother scooted into the delivery room, less than 15 minutes later my beautiful nephew was welcomed into this world...


Later on that day, after spending a few hours enjoying our new little red-headed bundle, my youngest sis and I sat down at the kitchen table in my middle sister's apartment. A couple of unopened Chinese fortune cookies were staring at us in the face. I mean, who just leaves those things there? No, we don't EAT the cookies, silly...but we HAVE to read what the fortunes are, duhhhh! Am I right?

Though I don't advocate going by those fortunes {we don't want to go by anyone else's predictions about the future except for true prophecy in God's Holy Word and His own Voice}, I was a bit intrigued by my sister's cookie message. It read:

"We live at the edge of the miraculous."

She then asked me "What does that mean?" Not gonna lie, I had no clue. I liked it though and told her that I will find out. That got this Christian mind thinking. What is "the edge of the miraculous?"

The very definition of miraculous is something that occurs through a divine intervention
Let's break these definitions down:
Divine = anything from or of God
Intervention = interference

The miraculous is God bringing forth something wonderful that interferes with our lives.  

What we had experienced that day WAS definitely something miraculous! Pure, beautiful life!
It is a miracle how God can create and breath a new soul into this world. What is more is how He can form us from inside of the womb and delegate a specific plan for us, before we even utter our first cry. Everything God says and does is nothing short of miraculous!

We are at the edge of it every day. Whenever we wake up, laugh, shed tears, walk, talk, love and even work...we are at the edge of miraculous. To us, these have become mundane things. We take everything for granted because they seem to just happen on cue. But it had to start somewhere and God started it all! He made us, gave us life and has a plan for us all.
We don't have to think of something farfetched or out of this world when we think of the word "miraculous". The divinity of the Lord is showcased in every small thing, even cells and amoebas.

One atom showcases His Almighty power just as much as the very universe Earth rotates in! 

Today, take one minute. Seriously, time yourself. Look around you, open a window, take a deep breath. Observe. Reflect. Pray. Meditate. You are a miracle. Your life is miraculous. God is divinely intervening all the time and every single day. Be still and enjoy sitting at the edge of it.  


Thursday, March 28, 2013

DIY Baby Sensory: Edible Painting with Real Fruit!


Naturally I am an artist so I'd love to pass on some creativity to my youngin'. I mean, come on, his good looks are from his daddy {insert brownie points here.} I combed Pinterest looking at different edible painting ideas on various blogs and sites but none of them fit what I wanted to do with my boy.

David was breastfed and when he was introduced to solids, I took time to make the food myself. It saved us lots of money and I felt good about feeding my baby real, wholesome meals instead of factory infested foods, like his mommy and daddy eat. I understand not every mom can do this, I'm not boasting here. You gotta do what you gotta do. I was blessed to be able to give my baby the best nutrition especially within his first year of life.

Enter in this homemade paint recipe I whipped up! I thought "You know, fruit is colorful, why not paint with it?" This is how my brain works, friends. I see something not as it is but what it can become. Rather than using corn syrup, sugars and artificial dyes, I opted instead to use natural fruit with some ingredients we already have on hand at home.

What you will need:
- Fresh or frozen fruit {I used frozen and just microwaved until soft. I lack patience, what can I say}
- Medium bowl
- Flour
- Water
- Paper
- A cute baby {check!}

I went with raspberries and blueberries. In the photo above, I show the ingredients in measuring cups. This really is for just the photo. It doesn't take that much flour or water to create the paint paste we need. I suggest play around and try mixing to get the consistency you like.
Tip: try mixing 1 ounce of fruit, 2 tsp flour and 2 tsp water to start. Then go from there.


The first photo shows the fruit before the added ingredients. If the fruit is soft enough, mash it with the spoon. If not, put it in the blender for a few seconds then mix in the flour and water. The second photos shows how the fruit thickens and becomes more paint-like.


That's it! Now for the fun part. If you are a tidy mommy, just stop now. The baby will get messy. The floor will get dirty. The highchair will get out of control. A bath will be in order. But the way I see it, I not only have a boy who will get messy eventually but I feel that getting his hands dirty and really into things is part of the learning experience. This is good for baby's tongue to explore texture and tastes but also for his hands to touch and understand different textures. Paint with real fruit, what else is better! I didn't have to worry about what he was consuming when he ate some {because of course it will go into the mouth.} And as you can see, he loves painting with fruit too.


Wednesday, November 7, 2012

Super Baby!! {DIY Children Photography}


Fighting crime, all before bedtime!

So if you haven't figured out by now, I love being creative. Go figure.
I started thinking about David's 6 month photo shoot {we love to do this ourselves; we can't fathom spending money on something that we can create, have fun with and make memories}...then it hit me...like a falling piano...SUPER BABY!!

With the release of The Avengers {and my handsome and I totally watching every superhero movie available via Netflix} it was an obvious choice. Given that I'm also an artist and grew up in a family of illustrators, I just HAD to do it. So, I set the stage...

 I love his room! Big enough to create this DIY photo booth :)

 You can do this too! Here's how:

1.) Gather some fun items for baby, like sunglasses, costumes, props etc.
2.) Doodle on some Kraft paper or hang some fabric in the background
3.) Throw down a plush blanket...wala, magic!
Tip: Use natural light bulbs in the lamps. Makes the photos much clearer.
Also, put on some cool tunes...we had some Christian jazz playing :)

And here's what happened!! :


I am SO in love with these photos {oh yeah, and the boy too.}

  Who is YOUR favorite superhero?

Related Posts Plugin for WordPress, Blogger...
Blogging tips