Showing posts with label painting. Show all posts

Friday, June 7, 2013

Art is Life / 30 day challenge


Let's face it. Life can be hard.

I'm stopping in today to share this fun new art challenge I've created for myself. Why? Because life can be insane and it's so easy for someone who is creative to lose sight of the joy of creating art! I used to sketch a lot. It was and is very therapeutic. I want to go back to that! Will you join me?

For the next 30 days, I will create art once a day. Whether it's sketching, drawing, painting...whatever. I will follow each day's challenge and see what happens! That's it! So easy and I think it's going to be a blast. At the end of the challenge, I should be able to look back on 30 pieces of works that speak about life. Hopefully I'll feel better about myself as an artist and what I've accomplished.

Here is what you need to know if you want to participate in this challenge:


The rules above are self-explanatory. This challenge is suppose to be fun, lighthearted, family friendly and inspirational. I know inspiration for everyone is different but please let's keep this clean!

- You don't have to start at the beginning of a month. No sir, just start from whatever day YOU decide. From that point on, the challenge starts! It can be the 2nd of the month, the 10th, the 21st...just from whatever point you start the challenge, follow it through the next 30 days. This way if you just find out about this challenge in the middle of a month, you won't feel bad about jumping in because "it's almost half over."

- Feel free to share the challenge through your social media and get other artists on board! Pin the photo above, share on your Facebook page, tweet about it and be sure to share your art challenges on Instagram. I'll be checking out everyone's art and even sharing some! Just use hashtag #ailchallenge

- Link up your posts below
If you blog about the challenge and share your artwork in a post, link it up! Hopefully it will be a cool gallery of daily inspiration. *The linky gallery below is setup for an entire year! I'll be checking it periodically to make sure all posts are only related to this challenge. Please DON'T link up your home page, shops, social media pages etc. DO link up blog posts featuring your works from this challenge!* 

I am going to do my best to stick with this challenge! The great thing is, once the challenge is complete, I can start over because my artwork will be different each time.

I won't be posting daily art on here but I will on my Instagram and Twitter. Hope you will come along for this journey and join me in the Art is Life challenge!


Thursday, March 28, 2013

DIY Baby Sensory: Edible Painting with Real Fruit!


Naturally I am an artist so I'd love to pass on some creativity to my youngin'. I mean, come on, his good looks are from his daddy {insert brownie points here.} I combed Pinterest looking at different edible painting ideas on various blogs and sites but none of them fit what I wanted to do with my boy.

David was breastfed and when he was introduced to solids, I took time to make the food myself. It saved us lots of money and I felt good about feeding my baby real, wholesome meals instead of factory infested foods, like his mommy and daddy eat. I understand not every mom can do this, I'm not boasting here. You gotta do what you gotta do. I was blessed to be able to give my baby the best nutrition especially within his first year of life.

Enter in this homemade paint recipe I whipped up! I thought "You know, fruit is colorful, why not paint with it?" This is how my brain works, friends. I see something not as it is but what it can become. Rather than using corn syrup, sugars and artificial dyes, I opted instead to use natural fruit with some ingredients we already have on hand at home.

What you will need:
- Fresh or frozen fruit {I used frozen and just microwaved until soft. I lack patience, what can I say}
- Medium bowl
- Flour
- Water
- Paper
- A cute baby {check!}

I went with raspberries and blueberries. In the photo above, I show the ingredients in measuring cups. This really is for just the photo. It doesn't take that much flour or water to create the paint paste we need. I suggest play around and try mixing to get the consistency you like.
Tip: try mixing 1 ounce of fruit, 2 tsp flour and 2 tsp water to start. Then go from there.


The first photo shows the fruit before the added ingredients. If the fruit is soft enough, mash it with the spoon. If not, put it in the blender for a few seconds then mix in the flour and water. The second photos shows how the fruit thickens and becomes more paint-like.


That's it! Now for the fun part. If you are a tidy mommy, just stop now. The baby will get messy. The floor will get dirty. The highchair will get out of control. A bath will be in order. But the way I see it, I not only have a boy who will get messy eventually but I feel that getting his hands dirty and really into things is part of the learning experience. This is good for baby's tongue to explore texture and tastes but also for his hands to touch and understand different textures. Paint with real fruit, what else is better! I didn't have to worry about what he was consuming when he ate some {because of course it will go into the mouth.} And as you can see, he loves painting with fruit too.


Saturday, October 6, 2012

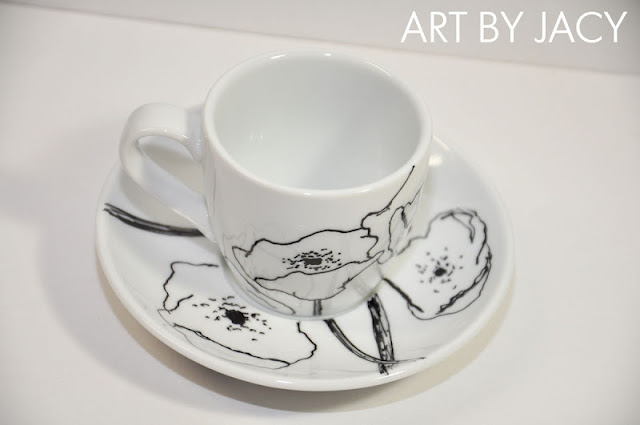
Porcelain Poppies {Video Tutorial}


The other day I had a stroke of genius...okay, maybe it was more of a mild heart attack of inspiration.

Anyway I realized, duh, I should do more videos of me sketching and doing my art!
Kinda makes sense since I've had a Youtube channel since 2010...with only a few sorry videos to share.

"Porcelain Poppies" was SO much fun to make! I setup my tripod, gathered all my materials, set the camera and recorded a freehand sketch on a porcelain tea cup and saucer set. Not gonna lie, setting up took MUCH longer than the actual filming! I had to work with the lighting (since I have all of my studio/art stuff in the basement...goodbye natural light, hello natural light lightbulbs!)


Overall, I think it came out pretty cool...enjoy the video!
If you'd like to check out past videos and/or subscribe to my channel, click here.
Comment below if you like what you see and want more videos.

Thursday, August 23, 2012

Mural with a View {Current Project}


 I know I haven't written much this week but my mind and days have been consumed...can you relate?
Just wanted to share with you a few photos of a mural I'm working on for a local fencing company here in CT, Luther Fence. I should be done painting it Saturday and then Tuesday will be the final trip!! Ah, almost there...don't you just love knowing when projects are almost done?? Even better, when you finish? I do :)

You can check out all the pics of this mural in this album, on my Facebook page

What kind of projects have YOU been working on lately??

Wednesday, August 15, 2012

I'm a Trendsetter...{Shop Update}

Visit my store on Storenvy

Before I shamelessly/excitingly share with you some of the fun art shtuff that I've been up to, I just wanted to take a moment to welcome all the new followers!! You guys are super-duper awesome, thanks for not just stopping by, but deciding to stay a while :) {Hope it's worth it haha}

Okay, so, I've been working my tail off updating my new online shop! I'm still over at Etsy, but honestly, I'm too poor and cannot afford paying any more fees! {ya'll feel me?!}
Then thanks to my girl Alissa over at Rags to Stitches, I heard about Storenvy. I'm still getting the hang of how they do things, but seriously guys, they rock so far! Haven't had a sale yet so I don't know how that part goes but the updating process for products/photos/listing descriptions etc is soooo much easier {and social media friendly too, yay!}

Here are some photos to preview what I have in my shop thus far {click on the image to be linked}:


Pretty fun, huh?
I've been having a blast with these!!

The thing is, I'm not sure how to organize my shop tabs...should I keep it, by category/theme OR go by print size/original art/etc? I'm just wondering if my tabs are too cluttered looking? You tell me!! Please click on the link below {or the "Shop" tab at the top of the blog} to be forwarded to my online store, then come back and leave a comment with a critique/opinion. Who better to trust with this decision then my amazing readers?? :)

Visit my store on Storenvy

Can't wait to hear what you guys think!!

Thursday, May 26, 2011

DIY Painting & Fabric Illustration {Tutorial}

We have moved passed Random Wednesday and now today I give you a behind-the-studio peek at what I have been working on...the question should really be what HAVEN'T I been working on!

I had a brilliant light bulb moment and decided to try it out. I LOVE fabric (tomorrow is Fabric Friday woohoo!) but I also love painting. So I have been wondering how can I combine the two loves...
then it hit me like a ton of snowballs. Canvas IS fabric, der! Just stretched and painted.
Then came the idea of using acrylic paint, a needle and thread, some scrap fabric, and my drawing skillz...
Here is a step-by-step look at what I created:
This is an illustration that I did and I have to say it's one of my favs. I used this as my inspiration.


 Okay, so I took an 8x10 canvas and painting the entire surface aqua.
Then I used an acrylic white wash technique and created white stripes.
Love stripes!

 That created a nice background. I then sketched on top with pencil, and went over it with sharpie.
Okay...I LOVE sharpies too! I have like every color...
You will notice I drew everything except the little flowers.

 That's when the fabric comes in! I measured about 11" and cut it into a strip.
Hint: The longer the strip, the bigger the flower.

 I then hand-stitched (as best as I can lol) across one side of the entire strip.

When I got to the end, I pushed the fabric down the thread like this. This created really neat ruffles :)
Then take both ends of the strip, bring them around in a complete circle, and sew them together...
 Like this! See, instant flower!
But I wanted to add some pizazz to it, so I grabbed my fancy-shmancy craft beads. 


Wala! All I did was sew the beads by hand to the middle of the flower.
Then I trimmed the edge afterward to the shape I wanted. Isn't is cute?!
Next, I needed to sew it to my illustration on the canvas...

 How awesome?! The needle goes right through, no problemo!
I placed my fabric flower where I wanted it, and sewed it to the canvas, tying it all together in the back.


Are you kinda getting the big picture?!

Just one flower wasn't going to be good enough,
so I made two smaller little rosettes to complete the hair accessories...

 See!! How cool?!

Now for the finishing touch...paint!
I do recommend doing this first though before putting on the flowers.
You don't want to get paint on the pretty little things
but I was just too excited to do this the right way! haha


I added a little water to the acrylic to give it that "washed" effect.
I do love how the hair came out :)

 Awww isn't it precious!
My light bulb idea worked. Now I'm wondering if paintings like these will sell??


What do you think??
<3
Related Posts Plugin for WordPress, Blogger...
Blogging tips