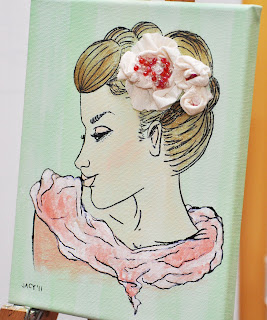
We have moved passed Random Wednesday and now today I give you a behind-the-studio peek at what I have been working on...the question should really be what HAVEN'T I been working on!
I had a brilliant light bulb moment and decided to try it out. I LOVE fabric (tomorrow is Fabric Friday woohoo!) but I also love painting. So I have been wondering how can I combine the two loves...
then it hit me like a ton of snowballs. Canvas IS fabric, der! Just stretched and painted.
Then came the idea of using acrylic paint, a needle and thread, some scrap fabric, and my drawing skillz...
Here is a step-by-step look at what I created:
This is an illustration that I did and I have to say it's one of my favs. I used this as my inspiration.
(Do you like it too? Check out my shop for your very own print!)
Okay, so I took an 8x10 canvas and painting the entire surface aqua.
Then I used an acrylic white wash technique and created white stripes.
Love stripes!
That created a nice background. I then sketched on top with pencil, and went over it with sharpie.
Okay...I LOVE sharpies too! I have like every color...
You will notice I drew everything except the little flowers.
That's when the fabric comes in! I measured about 11" and cut it into a strip.
Hint: The longer the strip, the bigger the flower.
I then hand-stitched (as best as I can lol) across one side of the entire strip.
When I got to the end, I pushed the fabric down the thread like this. This created really neat ruffles :)
Then take both ends of the strip, bring them around in a complete circle, and sew them together...
Then take both ends of the strip, bring them around in a complete circle, and sew them together...
Like this! See, instant flower!
But I wanted to add some pizazz to it, so I grabbed my fancy-shmancy craft beads.
Wala! All I did was sew the beads by hand to the middle of the flower.
Then I trimmed the edge afterward to the shape I wanted. Isn't is cute?!
Next, I needed to sew it to my illustration on the canvas...
How awesome?! The needle goes right through, no problemo!
I placed my fabric flower where I wanted it, and sewed it to the canvas, tying it all together in the back.
Just one flower wasn't going to be good enough,
so I made two smaller little rosettes to complete the hair accessories...
See!! How cool?!
Now for the finishing touch...paint!
I do recommend doing this first though before putting on the flowers.
You don't want to get paint on the pretty little things
but I was just too excited to do this the right way! haha
I added a little water to the acrylic to give it that "washed" effect.
I do love how the hair came out :)
What do you think??
<3
But I wanted to add some pizazz to it, so I grabbed my fancy-shmancy craft beads.
Wala! All I did was sew the beads by hand to the middle of the flower.
Then I trimmed the edge afterward to the shape I wanted. Isn't is cute?!
Next, I needed to sew it to my illustration on the canvas...
I placed my fabric flower where I wanted it, and sewed it to the canvas, tying it all together in the back.
Are you kinda getting the big picture?!
Just one flower wasn't going to be good enough,
so I made two smaller little rosettes to complete the hair accessories...
See!! How cool?!
Now for the finishing touch...paint!
I do recommend doing this first though before putting on the flowers.
You don't want to get paint on the pretty little things
but I was just too excited to do this the right way! haha
I added a little water to the acrylic to give it that "washed" effect.
I do love how the hair came out :)
Awww isn't it precious!
My light bulb idea worked. Now I'm wondering if paintings like these will sell?? What do you think??
<3


I LOVE this! So cool! Love the 3d effect with the flowers.. and I too LOVE sharpies! lol How cool.. I want to try something like this. You are so awesome Jacy! I def think these will sell!
ReplyDeleteThanks friend :)
ReplyDeleteLet me know if you end up creating something, would love to see it!
These are superb Jacy. The aqua really sets the colours off.
ReplyDelete